


Homemade Sanding Sugar aka Sand Sugar


My forte is cooking but with Club Foody pushing my comfort zone, I have to share some of my delicious baked goods. When it comes to decorations, it can cost a lot of money 💰 and one baking item that comes to mind is Sanding Sugar aka Sand Sugar. Just for a small little 5-ounce jar, some stores can be charged you over $3.50 per… It’s outrageous because making it from scratch is a fraction of that!
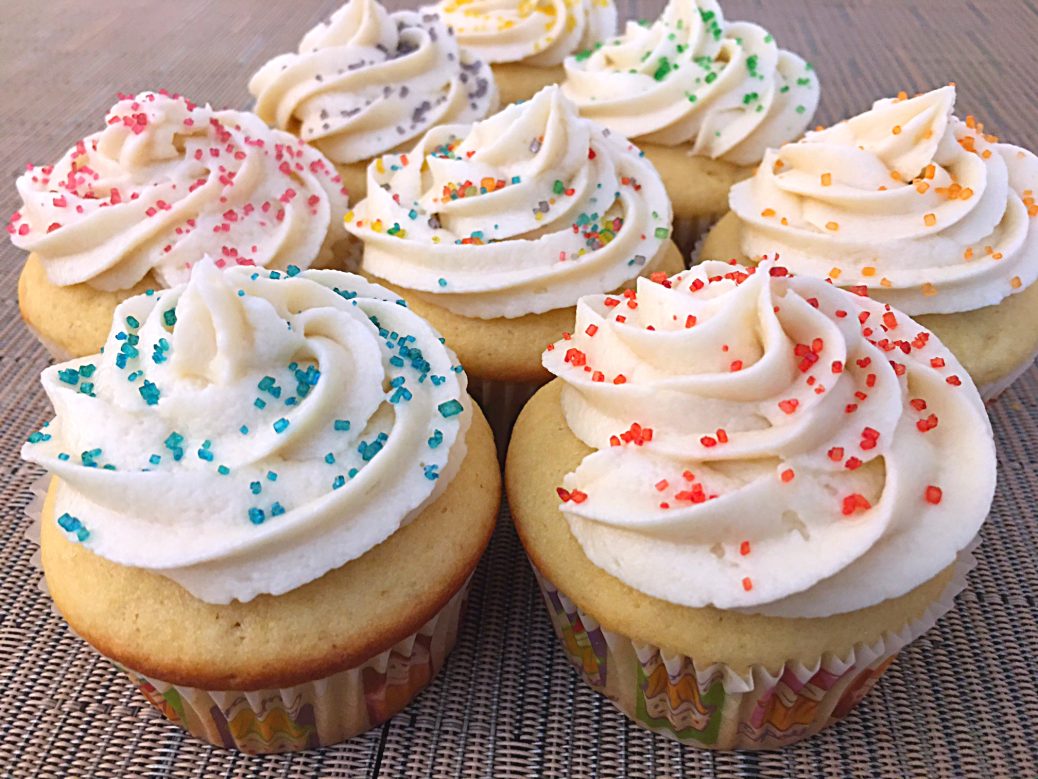
Sanding Sugar aka Sand Sugar is often used for birthday cakes 🎂, cookies, brownies, cupcakes, muffins, scones, gingerbread houses, ice cream and pancakes.
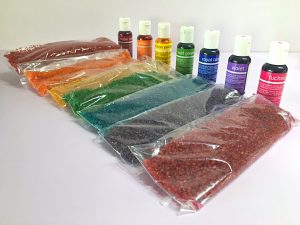
It’s a great way to color your baked goods. I often use some when I make cocktails 🍸 like my Chocolate Martini to either sparkle on top or on the rims. What you need is sugar and gel food coloring. Yes, there’s the price for the liquid gel but keep in mind that a little of it goes a long way.
I prefer using Liqua-Gel versus gel paste food coloring because it’s less thick. If you’re using the gel, it’s so easy to add too much therefore you’ll have to start all over again. I find the gel consistency is perfect when I want to color 🌈 large batches of icing or fondant. When it comes to Sanding Sugar aka Sand Sugar, I opt for Liqua-Gel and it takes only a drop or two until the color is achieved.
My preferred sugar is raw cane turbinado sugar and if I want it finer, I simply use the spice grinder although Sanding Sugar aka Sand Sugar is supposed to be coarse and not fine. Granulated sugar is totally not 🚫 the one to use for this application.
After the sugar is colored, I spread it on a baking sheet lined with parchment paper to dry out. There are two ways of doing it depending on the season. During the warmer months 😎, I transfer the colored sugar on a single layer on a baking sheet and push them together to prevent it from melting. Then it goes to a 170ºF preheated oven and I leave it there for 5 to 6 minutes, enough to remove any moisture. I don’t have to do that during the coldest months but if you live in Florida, you might have to use the oven.
Either way, there might be little clumps forming so gently rub them between your (clean) fingers 🖐 to break it up until separated. If you prefer, you can always use a sieve but I think it’s unnecessary. When I bake it a little, not only is it drier but I find the sugar looks shinier.
When the Sanding Sugar aka Sand Sugar is completely dried, transfer each color to a re-sealable plastic bags or small jars. It will keep for a very long time as long as it’s stored properly in a dry, dark area 😉.
Bon Appétit!🍽
Ingredients & Directions…
• ¼ cup raw cane turbinado sugar
• 1 to 2 drops liquid-gel food coloring of your choice
– Place sugar in a small re-sealable plastic bag and add 1 drop of liquid-gel food coloring to it – if needed, add another drop.
– Close the bag and massage it, shake it, flip it until the granules are well coated.
– Transfer to a baking dish lined with parchment paper and let it sit until dry or during the warmest months, transfer to a 170ºF preheated oven; bake for 5 to 6 minutes just enough to remove any moisture; allow to cool.
– If there are any clumps, gently rub them between your clean fingers to break it until the sugar is fine.
– When the moisture is gone, transfer to a jar or a small plastic bag and store in a dry, dark area.
Check out these other great kitchen tips and tricks… 😀
– Homemade Self-Rising Flour
– Vanilla Sugar – How to Make It
– Chocolate Honey Graham Cracker Pie Crust
– Perfect Meringue
– Powdered Sugar – Make it, Don’t Buy it!
– Measuring Honey, Syrup or Molasses without Sticking
– Buttermilk from Scratch
– Perfect Whipped Cream Every Time – How to
– Kiwifruits – How to Peel Quickly
and for more handy kitchen tips and tricks 💡, click on this link… Recipe Category • Tips & Tricks
Don’t forget to subscribe to our YouTube channel 📽 by clicking on this link… Club Foody YouTube