


No-Bake Strawberry Cheesecake

Oh, yes! The weather is getting warmer and warmer. Still, it won’t stop me from making desserts. Of course, there are the obvious ones like ice cream, pies 🥧 such as blueberry, lemon meringue, or key lime, cherry clafoutis, fruit salads, s’mores, and cobblers.
Among summer cakes, I think of Biscoff Icebox Cake or Charlottes, Upside-Down Cakes, Trifles, Lemon Blueberry Cake, Strawberry Shortcake, Tres Leche Cake, Pineapple Coconut Cake 🍍🥥, Pound Cakes, and many others. One that is on my summer favorites list is No-Bake Strawberry Cheesecake!
This decadent sweet treat is so vibrant, colorful 🌈, and rich. It’s the perfect dessert to make, especially when hosting, as it’s always a crowd-pleaser! The beauty of making this recipe is the fact that there’s no stress in baking it… well, not entirely, though.
From one graham cracker crust recipe to another, I change one ingredient: the sugar…
In this one, I use granulated sugar, while I use brown sugar in others. There’s no right or wrong choice. Besides their flavor, granulated sugar is drier and won’t retain as much moisture as brown sugar, which is better ✅ for chilling.
After dropping the crust into a non-stick springform pan, and pushing it up onto the sides to about an inch high, with an even thickness on the bottom, there are two options… It can be chilled while making the filling OR quickly baked for 5 minutes ⏳… both work.
I prefer quickly baking it for a few reasons. I like the crunchy, less crumbly texture, plus the toasted flavor from baking. It also helps the butter 🧈, sugar, and crumbs to bind together better, providing a stronger barrier for the filling, which in return, helps prevent it from getting soggy.
I’m not opposed to chilling the crust, but it doesn’t have the same results. I find it suits better for pudding or ice cream 🍨 fillings. The chilled crust is sweeter, plus it strictly relies on the cold temperature, which, in turn, can absorb moisture. Either one is still great for this dessert.
To bring the lovely flavor of the strawberries, there’s an important step to take…
After macerating the fruit for 20 to 30 minutes ⏰, processing in a blender until liquefied, and straining it, I pour it into a saucepan and reduce it to 1 cup. This step will help concentrate and intensify the taste of the juice so it can stand up to the tanginess of the cream cheese otherwise, it might get lost.
When the juice level goes down to 1 cup, it’s once again strained so there are no particles or little “cooked” chunks in it. The mixture has to be smooth 😉. At this point, you should be left with anywhere from 2/3 cup and ½ cup – if it’s over 2/3, cook it slightly longer.
The rest of this No-Bake Strawberry Cheesecake is easy-peasy…
Whipped cream is made until stiff peaks are formed and set aside. The cream cheese is processed until smooth and creamy before the cooled, reduced, and concentrated strawberry juice mixture is added to it. Then, after being well-mixed together, the whipped cream is gently folded in 🥄.
The filling is poured into the chilled pie crust, leveled out, and refrigerated for at least 8 hours, but preferably overnight 🌛. It helps to solidify the ingredients so the cake keeps its shape when slicing; for extra sturdiness, it can be transferred to the freezer for 1 hour. Also, it gives time for the flavors to mingle together, bringing a more cohesive, richer dessert.
When ready to unmold, I like to run a thin knife around the edges of the cake pan, rinsing 💦 and wiping it often. The pan is unlatched, and the cake is transferred to a serving plate or a cake stand. The leftovers are covered and stored in the fridge for up to 4 days.
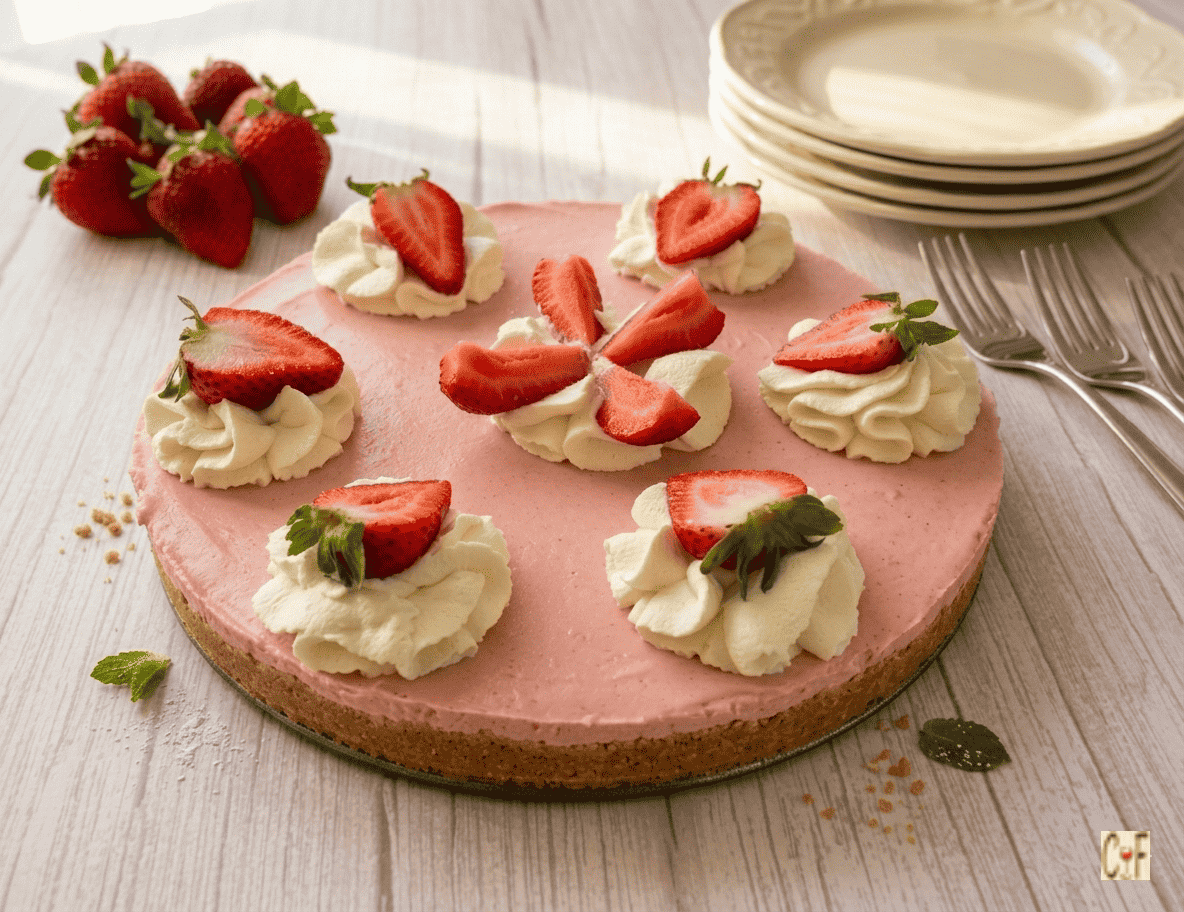
To decorate the cake, I add some whipped cream on top and garnish it with fresh strawberries. One of my girlfriends likes to pour on chocolate ganache, and when it solidifies, she finishes it with a few halved strawberries, leaving the green calyx 🍓, also referred to as the cap, on.
The month of June is all about strawberries, so what better idea than making 👩🍳👨🍳 this scrumptious No-Bake Strawberry Cheesecake! It’s light, refreshing, and can be made ahead. This is an excellent summer dessert for your gatherings…
Bon Appétit! 🍽
Check out these other scrumptious dessert recipes… 😀
– Skor Banoffee Pie
– Lemon Rosemary Madeleines
– Mango Purée with Mixed Berries and Cointreau
– Yogurt Bars with Fruit & Nuts
– Zabaione
– Raspberry Cream Cheese Rolls
– Pavlova
– Granita di Caffè Con Panna • Italian Coffee Granita
– Mixed Berry Crisp
– Orange Vanilla Yogurt Fruit Dip
and for even more dessert recipes, click on this link… Recipe Category • Dessert
Don’t forget to subscribe to our YouTube channel 📽 by clicking on this link… Club Foody YouTube

No Bake Strawberry Cheesecake
Hover to scale
Ingredients
CRUST
- 1 1/2 cups graham cracker crumbs
- 2 tbsp. granulated sugar
- 1 small pinch ground sea salt
- 6 tbsp. unsalted butter, melted
- 1/4 tsp. pure vanilla extract
FILLING
- 1 1/2 lbs. (about 680g) strawberries, rinsed and hulled tips & tricks
- 1/4 cup granulated sugar
- 1 cup cold heavy cream
- 1/2 cup confectioners' sugar, divided tips & tricks
- 2 packages (8 oz. each) full fat cream cheese, room temperature tips & tricks
- 1 tsp. pure vanilla extract
TOPPING
- 1 cup whipped cream see Recipe
- 4 large strawberries, washed
Directions
CRUST
- In the bowl of a food processor, add crumbs, sugar and salt. Process until blended. With the appliance running, slowly pour in melted butter and vanilla extract through the feed tube until the texture resembles damp sand.
- Pour into a 9-inch non-stick springform pan. Using the bottom of a small measuring cup or a glass, press the crumb mixture firmly up the sides to about an inch high, and spread the bottom out to an even thickness.
- Transfer to the fridge while making the filling (see footnote).
FILLING
- In a bowl, combine strawberries and granulated sugar. Macerate the two ingredients for 20 to 30 minutes.
- In the jar of a blender, add macerated strawberries, including any accumulated juices, and process until smooth.
- Strain mixture through a fine sieve sitting over a bowl, using a spoon or spatula to extract as much juice as possible; discard seeds.
- Transfer the strained strawberry mixture to a saucepan over medium heat.
- When it starts to simmer, reduce to medium-low, and reduce the it down to 1 cup, stirring occasionally.
- Strain the mixture again, and discard any small particles and cooked little chunks; what’s left should be between 2/3 cup and ½ cup. Set aside to cool.
- In a small bowl, add cold heavy cream and 1 tbsp. powdered sugar. Using a hand mixer, process on medium-high speed until stiff peaks form; set aside.
- In the bowl of a stand mixer, add cream cheese and the remaining 7 tbsp. confectioners’ sugar. With the paddle attachment, beat until smooth and creamy, cleaning the sides and the bottom of the bowl as needed. Mix in the vanilla extract.
- Add the cooled, reduced, concentrated strawberry mixture and process on low speed at first before increasing to medium-high speed. Process until smooth and creamy, ensuring there are no lumps by cleaning the sides and the bottom of the bowl.
- With a spatula, gently fold the whipped cream into the strawberry mixture until evenly blended.
- Spoon the filling into the chilled prepared crust, and level the top out with an angled spatula.
- Gently tap the springform pan on the counter to dislodge any trapped air bubbles, and cover with plastic wrap or foil. Refrigerate for at least 8 hours, but preferably overnight.
- When ready to unmold, run a thin knife around the edges of the cake pan, rinsing and wiping it often. Unlatch the pan, and transfer the cake to a serving plate.
- Garnish with whipped cream and strawberries. Cover the leftovers and store in the fridge for up to 4 days.
Notes
Don't forget to rate and comment on this recipe!
My son and his fiance came over last weekend, and I made this cake. Both my husband and son went for seconds. It’s a keeper. Thank you for sharing.
It’s my pleasure, LizaF 😉. This is a lovely summer dessert, and I’m happy everyone enjoyed the cake. Have a fabulous afternoon.
This recipe deserves a 10 STARS rating!! This is the most flavorful strawberry cheesecake I’ve ever tasted! I decorated it just like yours and received many compliments. Thank you.
You’re so kind, thank you Mrs. S. Riley 🙏. It’s my pleasure. One of my girlfriends likes to pour ganache on top, which honestly is awesome! Enjoy the rest of your day.
It was a WOWWOW! It’s probably the BEST no-bake strawberry cheesecake ever! We were able to taste the strawberry flavor, it wasn’t lost with the cream cheese. I forgot to take my packages of cream cheese out early enough to bring them to room temperature so I used your trick; great one, by the way. It’s certainly a keeper. Thank you Frankie.
Thank you so much, Arlene 🙏. That extra step does make a delicious impact on this cake. Many times it has happened to me, forgetting to take the package of cream cheese out. As a result, I really had to come up with some tricks, and tada!!! Here’s How to Soften Cream Cheese Quickly. Enjoy the rest of your afternoon.
I was just about to make your strawberry ice cream and then saw this recipe. I’m definitely going to make this cheesecake. What the hell, I’ll make the ice cream too, LOL!
There you go, that’s the spirit, lol! I love these little gems 💎, and during the month of June, I make so many recipes. Have fun with both recipes, Tiffany.
I’m making it but I won’t bake the crust. Was it not supposed to be a “no-bake” cheesecake recipe?
Yes, it was and it is. You don’t have to bake the crust, but I prefer quickly baking it for 5 minutes, and I give the reason why on the blog, so check it out. Have a nice evening 🌜, Mae.
I’ve watched your video and now I can’t get the recipe out of my mind. It means I have to bake it this coming weekend, haha. Thanks Frankie.
Oh no! I hate when that happens, lol 😅! Enjoy the recipe, Arlene.
I’ve made this type of recipe from other bloggers and the strawberry flavor was almost nonexistent. Your way makes a lot of sense. It’s on my “to-do list” this month. Thanks Frankie.
It’s my pleasure. That little extra step makes a huge difference. Enjoy the recipe, Paula 😀.
WOW! I have to make it. Thanks chef for taking the time to share all your delicious recipes. You’re AMAZING!!! We 💗 U
Aww, you’re very sweet, thank you Bee 🥰! I love sharing my passion so everyone can enjoy it. Have a lovely afternoon.
Here’s another delicious one, Francine!
Thank you, Heather 🙏. This dessert is so scrumptious… definitely a must-try. Have a gorgeous day.
yummy yum!!
Yum!! I like your method, and I’ll make it for Father’s Day. Thank you.
You’re welcome. It’s a great dessert to serve for any occasion 🥳. Have a fabulous day, Natalia.
It looks gorgeous!
Thank you, Dawn 😊. It’s the perfect summer dessert to make. Have a lovely day.