


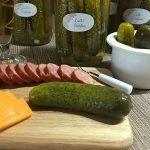
Dill Pickles


Canning is great because it lets you enjoy your favorite foods all year round. In my case, I started preserving food from necessity because I was too far from my home town. Living in Toronto, which is about a 5 to 6 hour drive from Montréal, my only alternative to enjoy certain foods was to make them myself. My mother’s Sweet & Savory Homemade Ketchup was the perfect example for learning this cooking method so I can enjoy it anytime I want.
Slowly but surely, I started getting a little more adventurous with canning and now, I enjoy it! After you’ve made a couple of recipes, canning is not such a big deal anymore. It doesn’t matter if you’re making Spicy Red Pepper Jelly, Strawberry Jam, Mango Chutney, Pickled Jalapeño Peppers or others, the steps are the same except the processing time may vary…
If you’ve never done canning before, I would say that Dill Pickles is probably the easiest recipe you can start with. After making the brine, the rest is pretty straightforward. The only thing you need to know is the processing steps. To learn them, I highly suggest you check out this link… How to Do Home Canning.
I would like to highlight an important point. After the recipe is done, they have to be stored in a cool, dark place for 3 weeks before enjoying them. Can you eat them before? Of course but I find that letting them sit longer will develop a better flavor.
Summer is probably my busiest season for home canning. If I see a good deal on certain fruits or vegetables, I buy a large quantity, make a canning recipe and enjoy them in future months. The same applies when those small pickling cucumbers are available at a good price. I then buy them and make my Dill Pickles or another recipe, my Bread & Butter Pickles.
Dill Pickles are a great condiment to have on hand. They are such a good accompaniment for a charcuterie platter, sandwiches or simply to munch on. If you want to give canning a shot, this is definitely a great recipe to try and it will make you feel like a pro…
Bon Appétit!
Check out these other delicious canning recipes…
– Homemade Apple Sauce
– Classic Marinara Sauce
– Pickled Beets
– Citrus Marmalade
– Black & Blue Jam
– Pickled Ginger
and for even more canning recipes, click on this link… Recipe Category • Canning
Don’t forget to subscribe to our YouTube channel by clicking on this link… Club Foody YouTube
Dill Pickles
Hover to scale
Ingredients
CUCUMBERS
- 4 lbs. pickling cucumbers, scrubbed and washed
- 2 tbsp. pickling salt
- 8 large cloves garlic, roughly chopped
- 8 large heads fresh dill tips & tricks
- 1 tsp. Pickle Crisp by Bernardin® Footnote #1
BRINE
- 5 cups water
- 4 cups white vinegar
- 2 tbsp. granulated sugar
- 4 tbsp. pickling salt
- 1 tbsp. pickling spice
- 1 tbsp. mustard seeds
Directions
CUCUMBERS
- Soak the cucumbers for 10 minutes in a produce wash. Rinse thoroughly before putting them in a large bowl; fill with cold water. Add 2 tbsp. pickling salt, cover and transfer to the fridge for 4 hours. Meanwhile, make the brine.
- After 4 hours, drain the cucumbers.
- Add 2 chopped cloves garlic per prepared jar (*see footnote #2) before filling with cucumbers. Add 2 heads of dill per jar and then add ¼ tsp. of Pickle Crisp per 1-liter jar.
- Fill up with cool brine, leaving about ½ inch from the top. Add the lids and apply the screw bands finger tight.
- Place the jars in a boiling water bath and when the water returns to a full boil, process for 5 minutes.
- Carefully remove and place the jars on a wire rack in a draft-free area to cool off before storing them in a cool dark place for 3 weeks before eating.
BRINE
- In a large pot over high heat, add all the brine ingredients. Stir well and bring the mixture to a boil; process for 10 minutes. Remove from the heat to cool off.
Notes
Don't forget to rate and comment on this recipe!