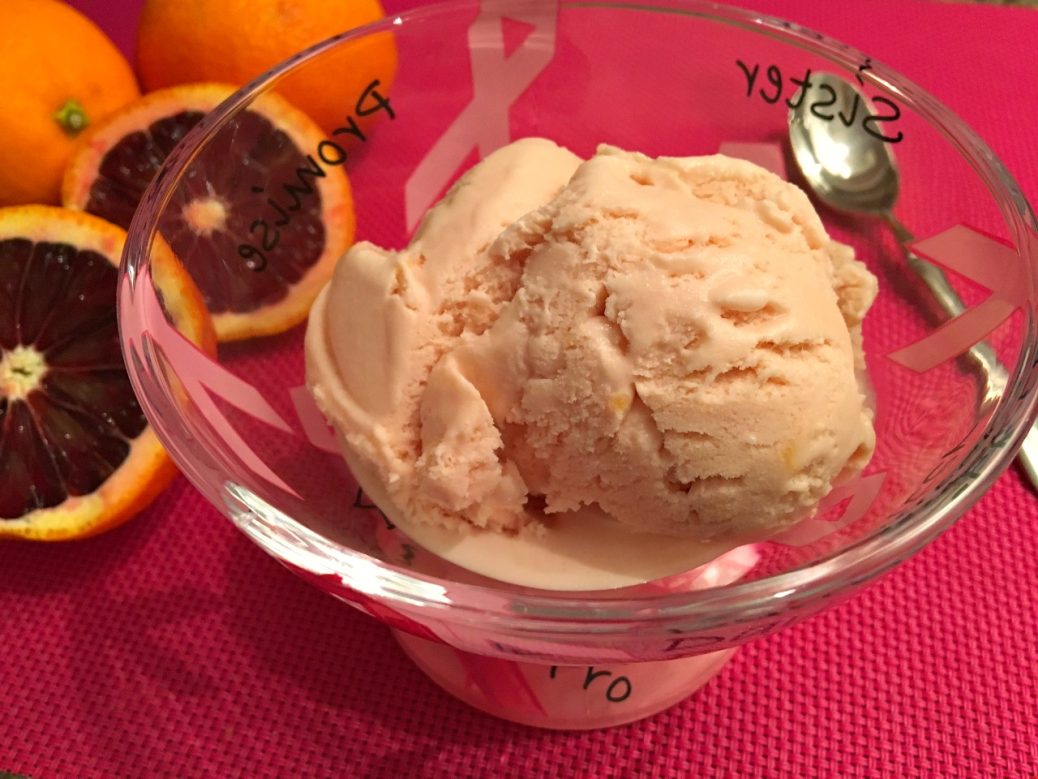
Blood Orange Ice Cream

I love going to the farmers’ markets 👩🌾👨🌾 and walking thru the aisles glancing at the fresh produce showcased in the displays but it’s not the same during winter. The selection is obviously more limited during the cold months of the year as there are only a few fruits and vegetables available during the winter time.
One of them is Blood Oranges! They are amazing and bloody good… lol😄! Compared to its counterparts, this fruit doesn’t have the same flavor, its texture is slightly different, and the color is definitely what sets it apart from the rest. There are also a few different varieties of these sanguine oranges.
The Moro 🍊 probably has the deepest flesh color and the strongest flavor of citrus and raspberry, making it slightly more bitter than the others. You can also find the world’s most popular variety… Tarocco. Originating in Italy, this blood orange is the sweetest and juiciest available. Although it also has red flesh, the color is not as pronounced as it is in other varieties.
There’s another variety that’s available later in the season and it’s called Sanguinelli. It originated in Spain and its properties are pretty similar to the Moro. You can enjoy this variety from February to May before they all disappear until next season. There are probably more varieties but these are the only ones I know of 😏.
What gives them their dark maroon color is the temperature dropping during the fall and even after harvest, they will continue getting darker in color. I have a preference when it comes to some foods… darker is usually better! I choose red grapes 🍇 over green and the same for red cabbage because the darker the produce, the more antioxidants they have! This also applies to blood oranges versus navels and others. They are great to cook with and the color makes your dish look even more interesting! That is why I decided to create this Blood Orange Ice Cream!
This cold treat is so amazing 🤩; it tastes just like an orange creamsicle! This Blood Orange Ice Cream is definitely in my top 5 cold treats. It’s creamy with a “fresh” orange flavor that I love to serve when I’m hosting a dinner party. My guests rave about it every time.
Besides this Blood Orange Ice Cream, I also make an amazing sauce with this fruit for my Duck Breast with Blood Orange Sauce 🦆… simply incredible! Another use for this amazing fruit is when I make my Blood Orange Martini, yum! Next time you go to your local grocery store, buy some blood oranges… you’ll be pleasantly surprised!
Bon Appétit! 🍽
Check out these other delicious cold treat recipes…😀
– Biscoff Icebox Cake
– Chocolate Peanut Butter Ice Cream
– Mango Sorbet
– Maple Walnut Ice Cream
– No Churn Vanilla Bean Ice Cream
– Strawberry Ice Cream
– Passion Fruit Ice Cream
– Coffee Ice Cream
and for even more ice cream recipes 🍦🍧🍨, click on this link… Recipe Category • Ice Cream & More
Don’t forget to subscribe to our YouTube channel 📽 by clicking on this link… Club Foody YouTube

Blood Orange Ice Cream
Hover to scale
Ingredients
- 5 medium blood oranges, juiced
- 1/2 medium navel orange, juiced tips & tricks
- 2 cups 35% heavy cream
- 1/4 cup milk (any except skim milk)
- 3/4 cup granulated sugar
- 1 pinch ground Himalayan pink salt
- 4 large free-run egg yolks
- 2 tsp. Cointreau (substitute Grand Marnier)
Directions
- Juice the oranges so the volume reaches 1 ¼ cups of liquid; set aside.
- In a medium saucepan over medium heat, combine cream, milk, sugar and salt. Stir until sugar is completely dissolved.
- In a small bowl, whisk the egg yolks until light and pale.
- Temper the eggs by very slowly pouring in about ¼ cup of the hot milk mixture, whisking continuously.
- Pour the egg mixture into the saucepan and whisk until very well blended. Reduce the heat to medium-low and cook for about 5 minutes, stirring constantly, making sure the mixture DOESN’T boil.
- Remove from the heat and let it cool to room temperature.
- About 30 minutes later, add orange juice and Cointreau if you're using it. Stir well, transfer to a large measuring cup and let it sit for another 15 minutes.
- Cover with plastic wrap and transfer to the refrigerator overnight.
- The next day, pour the mixture into an ice cream maker and churn according to the manufacturer's directions, about 15 to 20 minutes.
- Spoon ice cream into a container and transfer to the freezer for at least 4 hours.
Don't forget to rate and comment on this recipe!


This recipe is insanely delicious!
OMG! the flavors are out of this world🚀!!! Thank you Frankie, the best ice cream ever!
You’re so welcome Lindsay 😀! I 💖 the taste as well, yummy!
INCREDIBLE!!! A new favorite! Thanks for sharing
My pleasure!