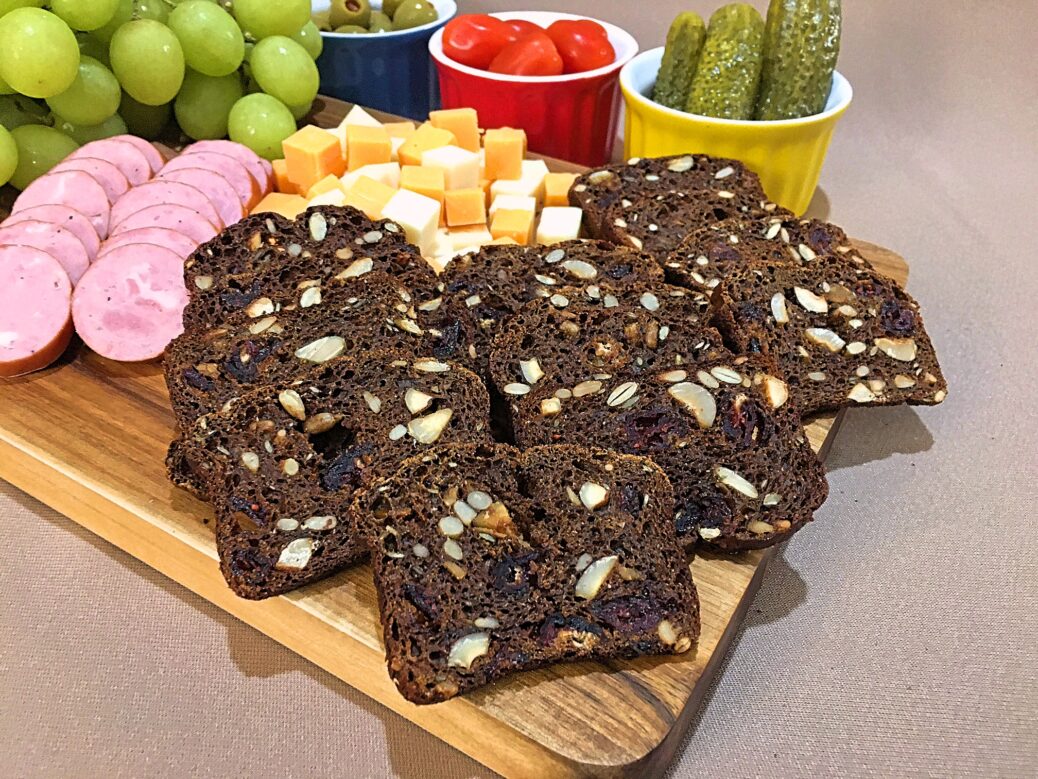
Raincoast Crisps Copycat

These days, we have to be wise with our money. The prices keep going up 📈 while our income doesn’t. We try to save in various places or buy when there’s something on special. We juggle our budget just to make ends meet.
When it comes to food, David and I are savvy when grocery shopping 🛒. If the price is right, we buy otherwise, we pass. There are certain food items that we slowly stopped buying just because of their prices… inappropriately too high!
Right here, in Vancouver Canada 🍁, there’s a company that makes these incredible crackers! They’re so elegant, very tasty but expensive! Eventually, we stopped buying them not by choice but they were way too pricey for no reason.
One of my girlfriends made these little guys and gave me the recipe. Of course, I altered it by slightly changing the ingredients and also the cooking method so they can be just like the real thing. Since then, I’ve been making 👩🍳 my Raincoast Crisps Copycat!
These crackers are amazing… actually, they taste better than the commercial ones! The recipe is easy to make plus… oh definitely, there’s a big plus ➕… you get a lot more for your money! The ingredients are fresher and you can always alter them to your liking!
The recipe is pretty straightforward; mix all the dry ingredients, stir the two wet ones before blending the dry and wet together. The batter is evenly poured into 4 mini loaf pans lightly greased and transfer to the oven for 50 to 60 minutes ⏰… not too complicated.
What I changed is this…
I add molasses versus honey 🍯 because it gives that nice dark color which is the staple of the crackers. I use hazelnuts instead of sesame seeds because that’s what goes into the original recipe. Lastly, I modified the cooking method.
Just a quick note when stirring buttermilk and molasses together. Make sure there are no streaks of molasses or some stuck at the bottom or on the spoon 🥄 before adding it to the dry mixture. If desired, these two can be processed in a blender. To get a great tip when handling sticky ingredients, click here… Measuring Honey, Syrup or Molasses without Sticking
When mixing dry and wet at once, use a spatula to clean the sides and the bottom of the bowl. Be careful as there will be pockets of flour in the mixture and this is the last thing you want. The batter should be smooth and uniform 😉.
Let’s go back to the cooking method for these yummy Raincoast Crisps Copycat…
Halfway through cooking, I rotate the pans. The ones in the back are switched with the ones in the front. As you know, there’s always a hotter 🔥 spot in the oven so it’s recommended to do this step.
After they’re done and cooled completely, the loaves are individually wrapped in foil. From here, there’s two options. Either they’re frozen for 2 hours 🕑 and then sliced OR chilled overnight and the next day, they’re moved to the freezer for 2 hours (this is my preferred method).
Whichever way, they have to be thinly sliced. We’re looking for about 1/8th of an inch… that thin! I tried with a mandoline and it was a disaster – the meat slicer is no better. The only method that works is the ‘ol serrated knife 🔪… just take your time! You should have between 22 to 25 pieces per loaf pan.
The next step is what gives the crispiness to the crackers. After being laid in a single layer on large baking sheets lined with wire racks so the air 💫 can circulate, they’re transferred to a 250ºF preheated oven for one hour.
Halfway through baking ⏳, I like to take the sheets out, flip the crackers on the other side and when returning the sheets back to the oven, the one that was at the bottom rack goes to the top and the other one goes to the bottom.
When the crisps come out, let them cool completely before storing them in an airtight container. They’ll keep for up to 3 weeks if they last that long – in our house, they don’t last more than 3 days 😏. They can also be frozen for up to 2 months.
By using my method, you’ll be able to achieve the same results as the ones from the store… even better! This delightful Raincoast Crisps Copycat is a great recipe to have! You get more for your money 💰, they’re fresher plus tastier!
Bon Appétit! 🍽
Check out these other delicious bread recipes… 😀
– Tomato Rosemary Focaccia
– English Muffins
– Artisan Bread
– Crostini
– French Baguettes
– Indian Naan Bread
– Mediterranean Olive Bread
– Dinner Rolls
and for even more bread recipes 🍞🥨, click on this link… Recipe Category • Bread & More
Don’t forget to subscribe to our YouTube channel 📽 by clicking on this link… Club Foody YouTube

Raincoast Crisps Copycat
Hover to scale
Ingredients
- 1 cup unbleached bread flour Footnote
- 1 cup unbleached whole wheat flour
- 1/4 cup brown sugar
- 2 tsp. baking soda
- 1/2 tsp. ground Himalayan pink salt
- 1 cup dried cranberries
- 1/2 cup hazelnuts, chopped
- 1/4 cup pumpkin seeds
- 1/4 cup sunflower seeds
- 2 tbsp. flax seeds
- 2 cups buttermilk see Recipe
- 1/4 cup blackstrap molasses tips & tricks
Directions
- Preheat oven to 350ºF and lightly spray 4 mini loaf pans; set aside.
- In a large mixing bowl, combine both flours, brown sugar, baking soda, and salt; whisk until nicely blended.
- Stir in cranberries, hazelnuts, pumpkin seeds, sunflower seeds and flax seeds; set aside.
- In a large measuring cup, combine buttermilk and molasses; stir well.
- Add to the dry ingredients and stir until well mixed making sure the dry ingredients are soaked and there’s no pockets of flour.
- Pour batter evenly into the prepared loaf pans and transfer to the preheated oven. Bake for 50 to 60 minutes or until a cake tester inserted in the center comes out clean, switching the front pans with the back pans halfway through cooking.
- Remove from the heat and let them cool for 15 minutes before unmolding and transfer the loaves onto a wire rack; allow to cool completely.
- Wrap loaves individually in foil and transfer to the fridge overnight.
- The next day, move them to the freezer for 2 hours.
- Preheat oven to 250ºF and line large baking sheets with wire racks; set aside.
- Using a serrated knife, slice loaves as thinly as possible (about 1/8-inch thick) and lay the slices in a single layer on the prepared baking sheets.
- Transfer them to the preheated oven and bake for 1 hour. Halfway through cooking, take the sheets out and flip the crackers. Return the sheets back to the oven but switch them - the one that was at the bottom rack goes to the top and vice versa.
- When time is up, let them cool completely before storing in airtight containers for up to 2 weeks or freeze them for up to 2 months. Yields between 88 to 100 crackers.
Notes
Don't forget to rate and comment on this recipe!


They are so delicious! Better than the store ones.
Agree 😉! You can change the ingredients is you want! I love making them 💖
Everything is so expensive and our family has no choice than to cut on unnecessary items like these crackers. I came across your website, made a batch and to my surprise, they were better than the ones from the store. Thank you for sharing and making me save $$$
I know, we have to be savvy and watch where we spend our 💰! I make them often. Not only incredible, they’re also a fraction of the cost! Have a fantastic day Linda B
This past weekend, I hosted my annual party and served these crisps with salmon pate, your beet hummus, cheeses, and so on. All my guests raved about them. Kids are coming over tonight and there’s already a batch in the oven… they’re addictive! Merry Christmas and thank you for sharing your recipes.
I’m so happy your guests loved them 😀! Oh yes, they are! It’s my pleasure Liza! Merry Christmas to you and your family 🎄
I know these crackers very well. I buy them at Murray’s Cheese at Grand Central Market. They’re expensive and never thought to make them from scratch. These are on my to-do list for my Christmas party next weekend. Thank you for sharing
You’re right Liza… this little package is pricey! By making them yourself, not only you save 💰 but also you’ll end up with 100 crackers… not too bad, right! Enjoy the recipe and have fun at your Christmas party 🎄